

How to: Take Great Photos of Your Work

Thinking about entering our competition this Spring? Hooray! Want to take a quality photo of your work? Don't worry. We've come up with some tips for getting a sharp, hi-res shot of your artwork (with no fancy equipment needed.)
1) Prepare!
Don't forget to give your masterpiece a last minute primp before taking the photos. You want it to look the best it can be...so make sure the surface is clear of dust, pencil marks, pet hair, biscuit crumbs - or any other debris that might affect your image.
2) Find a suitable place to take your picture
- Keep it simple! Ideally you're looking for a room with natural light. The best spot is to take your photo against a wall, opposite a window on a cloudy day.
- Stand far enough away so that there are no shadows on your artwork, and make sure your image is straight, and square on to the camera - it seems obvious, but it's worth getting right as it'll save you time post-shoot!
Top tip: if you've got a textured artwork, you might find it useful to set your image at 45 degrees to the light rather than 90, to make the texture pop.
3) Keep everything still
If you've got a tripod, time to set it up! If you haven't, use a stack of books or something else steady to keep your camera in place. Avoid super-cheap tripods if you can - they can look the part but usually end up being a lot more hassle than they're worth.
4) Set up your camera.
- First of all, you're going to need a fairly decent camera, 13 megapixels and over is preferable. Make sure you set it to the maximum resolution.
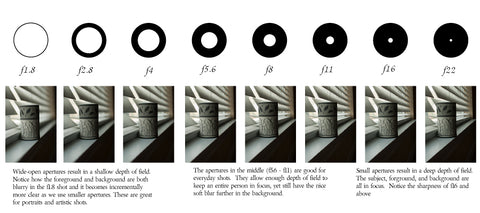
- Next choose a low ISO to keep the image sharp, but make sure your aperture is high, so the whole image stays in focus. This means you'll have a slow shutter speed. This is why it's important to have to camera on a completely still support to prevent your imaging getting blurred.
- No flashing. Make sure you disable the flash, as this will prevent washed-out colours.
5) Set the timer and take some photos!
Setting the timer is important to make sure you get a sharp, non-blurry image. Don't forget to keep your shadow out of shot!
6) Edit your images
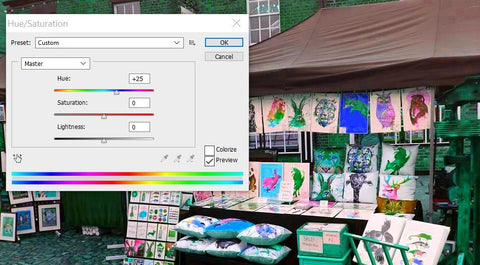
Get to grips with photoshop. This is great for adjusting the saturation and the levels in your photo.
- By adjusting the levels, you may be able to enhance the artwork - for example, reduce the greys that are picked up from canvas or card, and potentially remove textures you don't want to see.
- Saturation can enhance colour that little bit - (please don't go overboard!) but it can bring life back into a piece of work that had it zapped out a little by scanning or photographing.
..And that's it! Simple, really.
Of course there are other ways to digitize an image too, like scanning the artwork in. We'll be covering this very shortly on our blog too, so remember to check back!
Looking for some more photography tips? Check out DigitalRev for some great tutorials.